Save
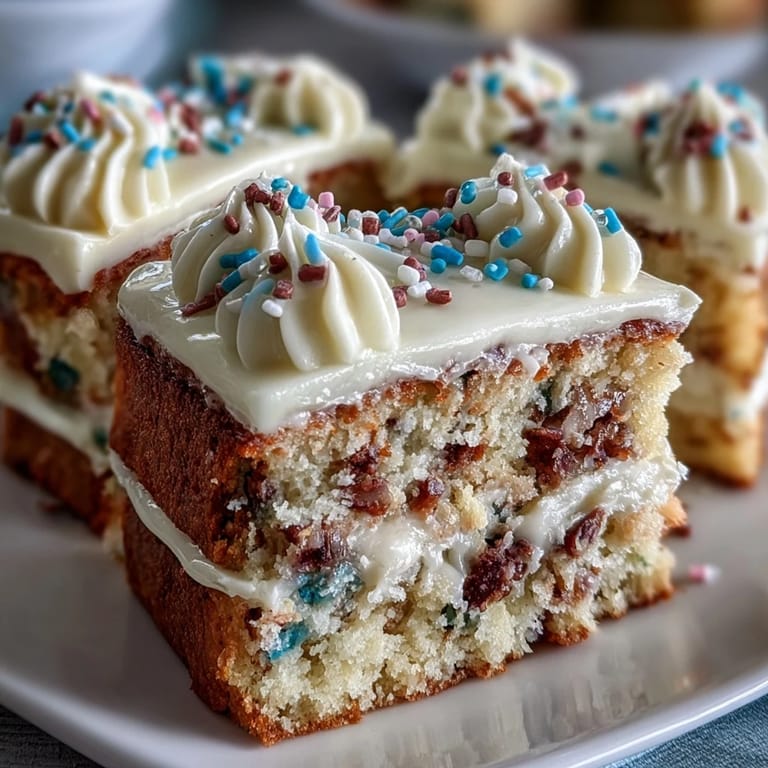
Save There's something about baking a sheet cake for a graduation that feels like you're marking time itself. My neighbor asked me to make one for her daughter's Class of 2026 party, and I realized I'd been making the same dense, overly sweet cakes for years without thinking much about it. This recipe changed that—it's the kind of cake that stays moist for days, tastes like real butter and vanilla, and gives you just enough canvas to make someone feel celebrated with a piping bag and food coloring. When I pulled it from the oven and saw how perfectly golden the edges were, I knew this was the one I'd make again and again.
I'll never forget the moment I piped the Class of 2026 onto that cake—the graduate's mom stood next to me in the kitchen, and we both got a little teary watching those numbers take shape. It wasn't just about the cake at that point; it was about marking a milestone, about knowing that this dessert would sit in the center of their party and become part of their memory of that day. The simplicity of the cake meant I could focus on making the piping beautiful, and that small detail somehow mattered more than I expected.
Ingredients
- All-purpose flour (2 ½ cups): Measure by spooning into your cup rather than scooping directly from the bag, which compacts the flour and makes the cake dense.
- Baking powder (2 ½ tsp): Check the date on your container because old baking powder won't lift the cake properly, and you'll end up with a heavy, sunken middle.
- Salt (½ tsp): This tiny amount enhances the vanilla flavor more than you'd think, creating depth without tasting salty.
- Unsalted butter (1 cup for cake, 1 cup for frosting): Softened butter creams faster and incorporates more air, which creates the light, tender crumb that makes this cake special.
- Granulated sugar (1 ¾ cups): This is what gives the cake its tender structure and slight browning on the edges.
- Large eggs (4, room temperature): Room temperature eggs blend seamlessly into the butter mixture rather than creating little cold pockets that deflate your batter.
- Vanilla extract (1 tbsp plus 2 tsp): Quality vanilla makes all the difference here since there's not much else competing for flavor—don't skip this.
- Whole milk (1 cup plus ¼ cup): The milk keeps the cake from becoming too dense while the buttermilk alternative would add tang you don't want here.
- Powdered sugar (4 cups, sifted): Sifting removes lumps so your frosting spreads silky-smooth without gritty bits.
- Food coloring: Gel coloring works better than liquid because it doesn't thin out the frosting the way water-based coloring does.
Tired of Takeout? 🥡
Get 10 meals you can make faster than delivery arrives. Seriously.
One email. No spam. Unsubscribe anytime.
Instructions
- Set up your stage:
- Preheat your oven to 350°F and grease that 9x13-inch pan thoroughly—corners especially—then line it with parchment paper so the cake slides out without sticking. This step takes one minute but saves you from frustration.
- Combine your dry team:
- Whisk the flour, baking powder, and salt together in a medium bowl, making sure the baking powder is evenly distributed so you don't end up with little pockets of dense cake. Set this aside and feel confident that you've already prevented half the problems people have with sheet cakes.
- Cream butter and sugar until fluffy:
- In a large bowl, beat softened butter and sugar for about 3 minutes—you'll see it transform from grainy and yellow to pale and pillowy, almost mousse-like. This is where the cake gets its tender structure, so don't rush it.
- Add eggs one at a time:
- Add each egg individually and beat well after each one so it fully incorporates before the next arrives. If you dump all four in at once, the mixture can look curdled and panic you, even though it usually comes together in the end.
- Mix in vanilla and then alternate the dry and wet:
- Stir in the vanilla, then add the flour mixture and milk in three additions—flour, milk, flour, milk, flour—mixing just until you don't see white streaks anymore. Overmixing develops gluten and makes the cake tough, so stop as soon as it comes together.
- Bake until golden:
- Pour the batter into your prepared pan, smooth the top with a spatula, and bake for 30 to 35 minutes until a toothpick inserted in the center comes out clean or with just a few moist crumbs. The edges will pull slightly away from the pan and smell absolutely incredible when it's ready.
- Cool completely before frosting:
- Let the cake cool all the way in the pan on a wire rack, which takes about an hour but prevents the frosting from melting into warm cake. Patient cooling is the difference between frosting that stays put and frosting that slides around.
- Make the buttercream frosting:
- Beat softened butter until it's creamy, then gradually add sifted powdered sugar alternately with milk and vanilla, beating for 3 to 5 minutes until it's fluffy and light. If it looks curdled at first, keep beating—it smooths out as the sugar hydrates.
- Tint and spread:
- Divide the frosting and tint portions with gel food coloring if you're using school colors, then spread an even layer over the cooled cake using an offset spatula or the back of a spoon. Reserve some frosting in a separate color for piping.
- Pipe the celebration:
- Transfer colored frosting to a piping bag fitted with a small round tip and carefully pipe Class of 2026 across the top of the cake, working slowly and steadily so the numbers are clear and proud. Step back, take a photo, and feel the satisfaction of having just created something that marks a milestone.
 Save
Save What struck me most about that graduation party was how the cake sat in the center of the dessert table, and the moment the graduate saw it, she smiled in a way that had nothing to do with sugar or buttercream. Her friends gathered around taking photos, and I realized that a simple, well-made cake becomes a vessel for joy when it's baked with attention and decorated with care. That's when I understood why this recipe matters.
The Texture Secret
The key to a moist sheet cake lies in the ratio of butter to flour and the alternating method of adding dry and wet ingredients. This technique creates a tender crumb that stays soft for days rather than drying out the way many sheet cakes do. I learned this by accident when I rushed through a cake and added all the milk at once—the result was gluey and dense, nothing like this one.
Frosting That Holds Its Shape
Buttercream can be finicky if you don't beat it enough or if you use ingredients that are the wrong temperature. The secret is incorporating enough air into the butter before you add the sugar, which creates that fluffy, light texture that spreads beautifully and holds whatever you pipe onto it. I've also learned that sifting the powdered sugar is worth the extra 30 seconds—unsifted sugar leaves little gritty pockets that feel wrong on the tongue.
Making It Personal
Graduation cakes are opportunities to make someone feel specifically celebrated, and the Class of 2026 piping does exactly that. You can easily swap in school colors, add sprinkles that match their theme, or even pipe their name alongside the year. A few simple choices transform a basic vanilla cake into something that feels made just for them, and that's the whole point.
- Practice piping the numbers on parchment paper before committing them to the frosted cake, so your hand knows the motion and your confidence is higher.
- If gel food coloring isn't available, liquid coloring works but use less liquid milk in the frosting to compensate for the extra moisture the coloring adds.
- Store the finished cake at room temperature for up to two days if your kitchen stays cool, or refrigerate it for up to five days—both ways work perfectly for a party.
 Save
Save This cake has become my go-to for celebrations because it's foolproof enough to make any baker feel confident, yet elegant enough that no one suspects how simple it actually is. Bake one for someone you love, and you'll understand why it keeps finding its way onto party tables.
Recipe FAQs
- → What is the best way to achieve a moist texture?
Using room temperature butter and eggs, alternating flour with milk during mixing, helps keep the batter light and moist.
- → How can I customize the decoration colors?
Incorporate food coloring into the buttercream before piping to match your theme or school colors.
- → Can I prepare the sheet ahead of time?
The sheet can be baked and cooled in advance, then frosted and decorated shortly before serving for best freshness.
- → What tools are needed for the piping detail?
A piping bag with a small round tip is ideal for precise lettering and decorating on the buttercream surface.
- → Are there any tips to avoid cracking frosting?
Ensure the cake is completely cooled before applying frosting, and whip the buttercream until smooth and fluffy for easy spreading.
- → Is it possible to make this dairy-free?
Yes, substitute non-dairy milk and dairy-free butter to suit dietary needs while maintaining flavor.